Creating two node Nomad cluster
Nomad is an interesting alternative to Kubernetes. As authors of Nomad say, it is a suplement to Kubernetes and offers some great features.
Here you can find a guide on how to create a fresh Nomad cluster with two nodes. The first node acts as a server and client, the second node acts as a client only. I know this architecture is not recommended for production purposes, but I would like to test it only.
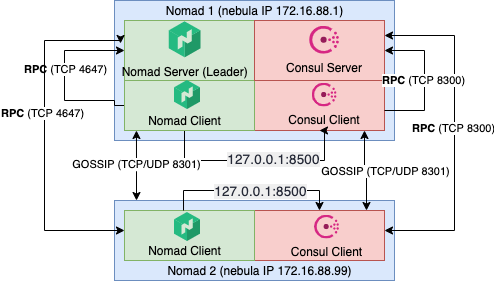
Both nodes are not connected to the same network they are in west Europe but different cloud providers. To fulfill the connectivity requirements between nodes, I connect them to the same network using Nebula, a scalable overlay networking tool. If all nodes are visible directly, Nebula is not necessary.
Install Nomad and other requirements
All steps in this section must be installed on all nodes.
Install Nomad
Add the HashiCorp GPG key:
curl -fsSL https://apt.releases.hashicorp.com/gpg | sudo apt-key add -
Add the official HashiCorp Linux repository:
sudo apt-add-repository "deb [arch=amd64] https://apt.releases.hashicorp.com $(lsb_release -cs) main"
Update and install:
sudo apt-get update && sudo apt-get install nomad
To verify Nomad was installed correctly, try the nomad command.
nomad
Install Docker Engine
I would like to test Nomad with containers, so a container runtime is required to install as well. I chose Docker, the full install manual could be found on Docker Install Page, but quick steps are here: Update the apt package index and install packages to allow apt to use a repository over HTTPS:
sudo apt-get update
sudo apt-get install \
    ca-certificates \
    curl \
    gnupg \
    lsb-release
Add Docker’s official GPG key:
curl -fsSL https://download.docker.com/linux/ubuntu/gpg | sudo gpg --dearmor -o /usr/share/keyrings/docker-archive-keyring.gpg
Use the following command to set up the stable repository. To add the nightly or test repository, add the word nightly or test (or both) after the word stable in the commands below. Learn about nightly and test channels.
 echo \
  "deb [arch=$(dpkg --print-architecture) signed-by=/usr/share/keyrings/docker-archive-keyring.gpg] https://download.docker.com/linux/ubuntu \
  $(lsb_release -cs) stable" | sudo tee /etc/apt/sources.list.d/docker.list > /dev/null
Update the apt package index, and install the latest version of Docker Engine and containerd, or go to the next step to install a specific version:
sudo apt-get update
sudo apt-get install docker-ce docker-ce-cli containerd.io
Install CNI plugin
Install CNI plugin to be able to run Docker containers in Nomad with bridge networking. More info about Docker drivers in Nomad could be found here. You can choose a version depending on your system:
curl -L -o cni-plugins.tgz https://github.com/containernetworking/plugins/releases/download/v1.0.1/cni-plugins-linux-amd64-v1.0.1.tgz
sudo mkdir -p /opt/cni/bin
sudo tar -C /opt/cni/bin -xzf cni-plugins.tgz
Setup Nomad
We need to configure Nomad before could be run. As I said before, nodes are connected using Nebula, so both nodes has two network interfaces, one with public IP (a default route) and one with internal private Nebula IP (preferred for intracluster communication).
Configure the first node
The first node has the name nomad1 nad here is the node’s Nomad configuration file content (/etc/nomad.d/nomad.hcl).
Full configuration options can be found at Nomad Configuration page.
data_dir = "/opt/nomad/data"
bind_addr = "0.0.0.0"

name = "nomad1"

# Advertise on nebula1 interface only (nomad1 has more interfaces, one with public IP and one with private IP - nebula1 interface)
advertise {
  # Defaults to the first private IP address.
  http = "172.16.88.1"
  rpc  = "172.16.88.1"
  serf = "172.16.88.1"
}

# Enable server on nomad1
server {
  enabled = true
  bootstrap_expect = 1
}

# Enable client on nomad1
client {
  enabled = true
  servers = ["127.0.0.1"]
}

# Enable raw_exec driver
plugin "raw_exec" {
  config {
    enabled = true
  }
}
Configure the second node
The first node has name nomad2 nad here is node’s Nomad configuration file content (/etc/nomad.d/nomad.hcl):
data_dir = "/opt/nomad/data"
bind_addr = "0.0.0.0"
name = "nomad2"

# Advertise on nebula2 interface only (nomad2 has more interfaces, one with public IP and one with private IP - nebula1 interface)
advertise {
  # Defaults to the first private IP address.
  http = "172.16.88.99"
  rpc  = "172.16.88.99"
  serf = "172.16.88.99"
}

# Enable client and setup server's IP to the nomad1 IP
client {
  enabled = true
  #network_interface =
  servers = ["172.16.88.1"]
}

# Enable raw_exec Nomad driver
plugin "raw_exec" {
  config {
    enabled = true
  }
}
# Consul agent will be running locally
consul {
  address = "127.0.0.1:8500"
}
Start Nomad
Enable nomad.service, start it and check its status on both nodes.
sudo systemctl enable nomad.service
sudo systemctl start nomad.service
sudo systemctl status nomad.service
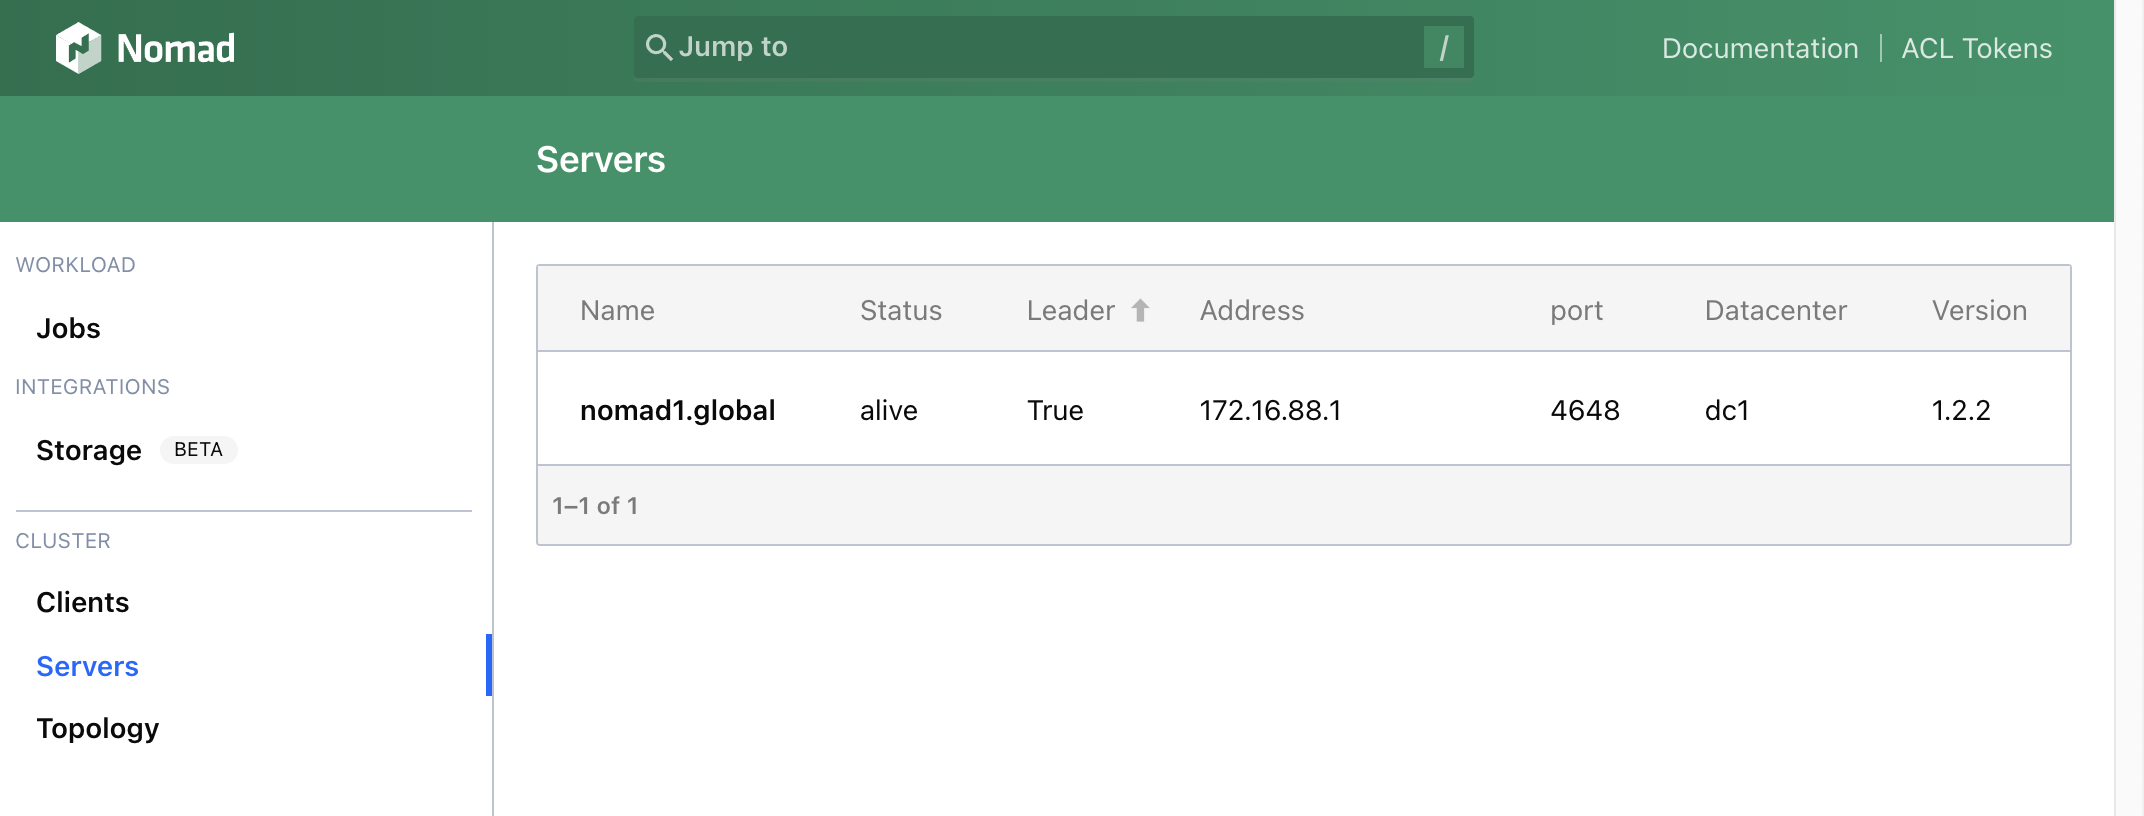
If everything works fine, you can visit Nomad Admin UI and check Client status - http://node_ip_or_hostname:4646/ui/clients:
Run example application
I want to run nginx Docker image and listen on client’s node port 8080, here is the full job example, just submit only:
job "http-echo" {
  datacenters = ["dc1"]
  group "echo" {
    network {
      mode = "bridge"
      port "http" {
        static = 8080
        to = 80
      }
    }
    count = 2
    task "server" {
      driver = "docker"
      config {
        image = "nginx"
        ports = ["http"]
      }
    }
  }
}
If everything works fine, you will see the running job in Nomad UI: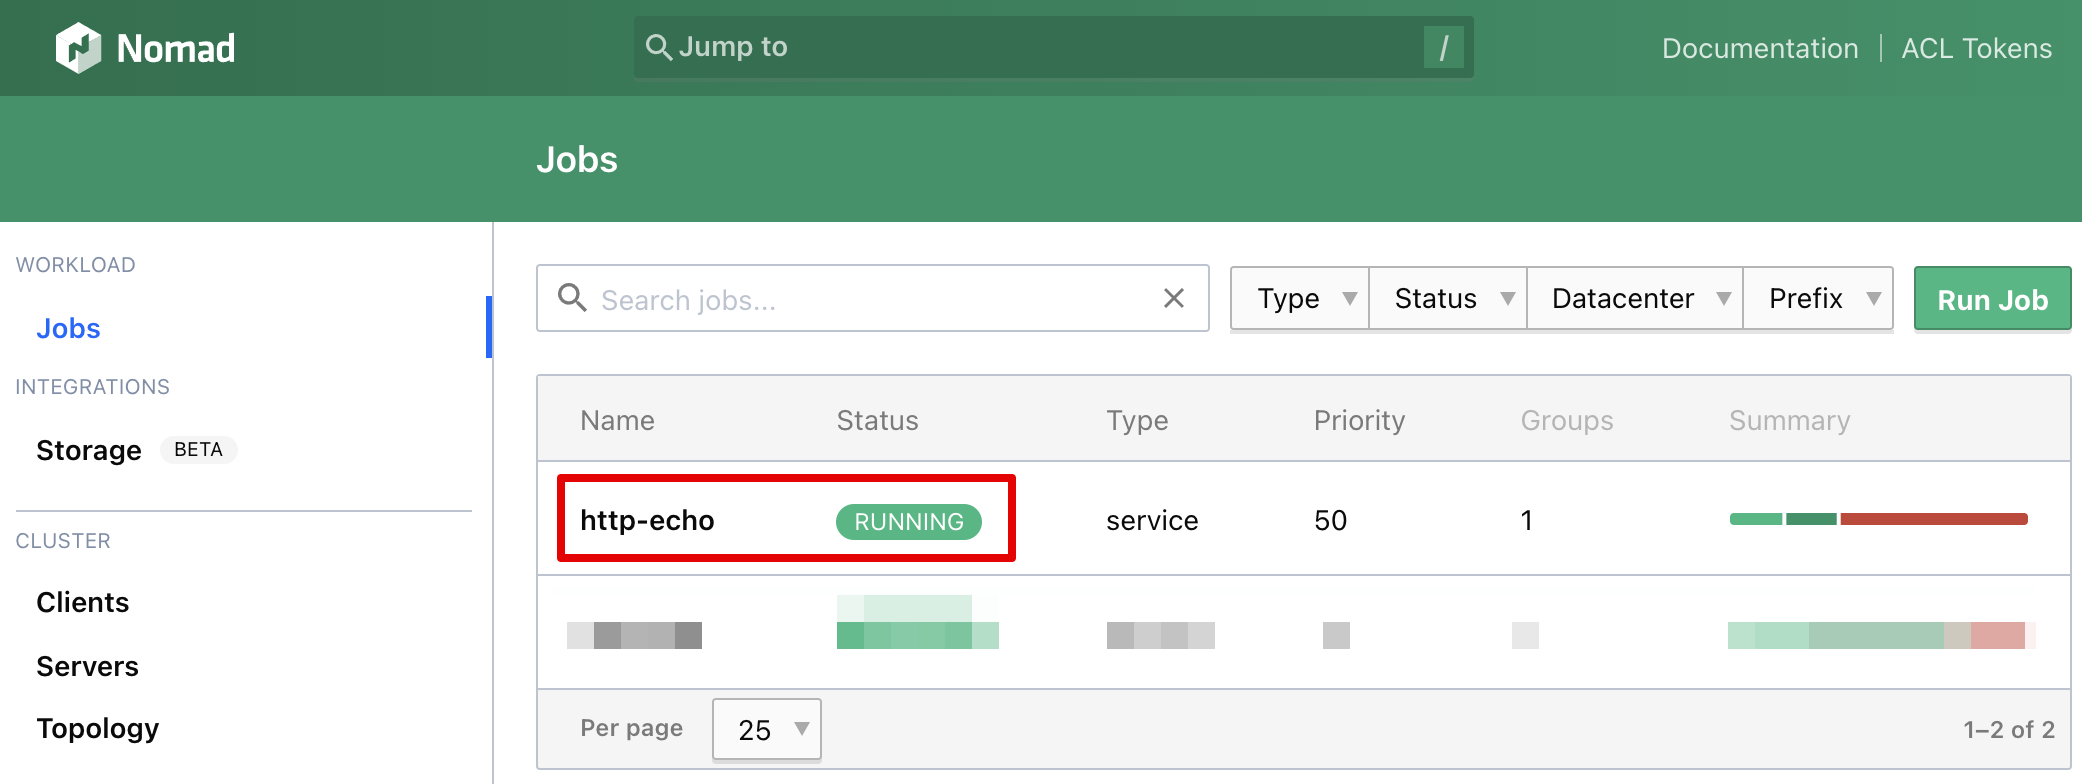
Now you can visit the Nginx page on the client’s public IP and port 8080 (two instances were required, so both client nodes should listen on port 8080):
Install Consul
Consul automates networking for simple and secure application delivery, as said by Hasicorp. I want to test an automatic service discovery when installing any job in Nomad, install and configure Consul required.
Install Consul
Install Consul on both nodes first:
sudo apt-get update && sudo apt-get install consul
Configure Consul on the first node (nomad1)
As the architecture diagram above shows, I want to run the Consul server and Consul agent on the same machine. This is not for production purposes and this is probably the reason why I didn’t found any option how to run Consul in both modes concurrently using configuration file /etc/consul.d/consul.hcl and run as system service. So I run Cosnul from the command line, where -dev argument says, that’s ok, run Consul as server and agent concurrently.
# temporary solution, for testing only
sudo consul agent -dev -client 0.0.0.0 -bind 172.16.88.1 &
The Consul has UI as well: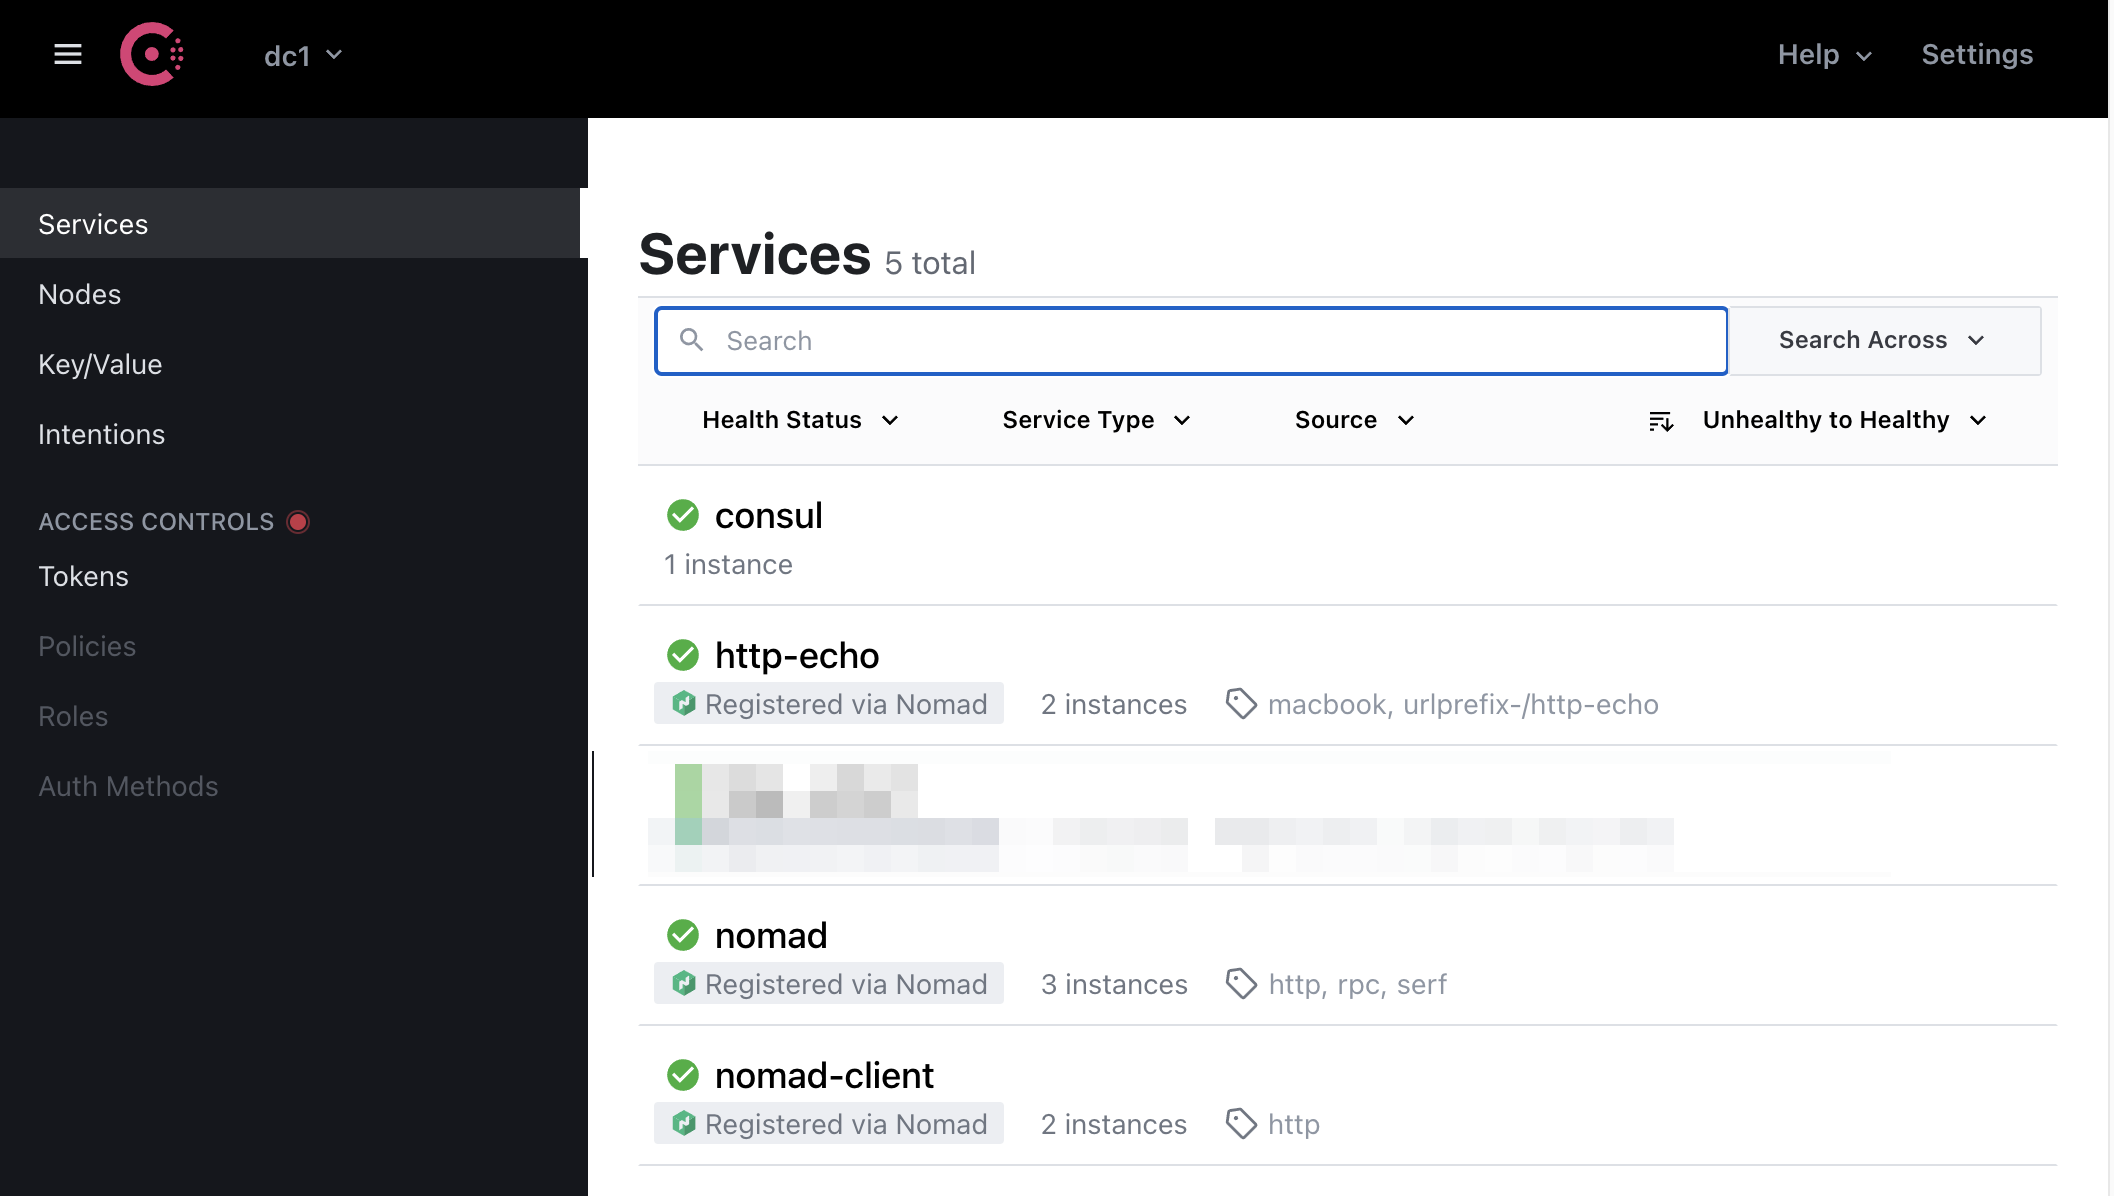
Configure Consul on the second node (nomad2)
The second node acts as a Consul agent only, so the standard configuration could be used:
sudo vi /etc/consul.d/consul.hcl
I changed these line only (the full file content is in resources/consul2.hcl):
bind_addr = "172.16.88.99"
retry_join = ["172.16.88.1"]
Enable consul.service, start it and check its status:
sudo systemctl enable consul.service
sudo systemctl start consul.service
sudo systemctl status consul.service
Run job with service discovery
I changed my previous job as follow, see service section:
job "http-echo" {
  datacenters = ["dc1"]
  group "echo" {
    network {
      mode = "bridge"
      port "http" {
        static = 8080
        to = 80
      }
    }
    count = 2
    task "server" {
      driver = "docker"
      config {
        image = "nginx"
        ports = ["http"]
      }
    }
    service {
      name = "http-echo"
      port = "http"

      tags = [
        "macbook",
        "urlprefix-/http-echo",
      ]

      check {
        type     = "http"
        path     = "/"
        interval = "2s"
        timeout  = "2s"
      }
    }
  }
}
Test Consul DNS service
One of the Consul features is its DNS feature. Consul resolves domain names to IP of Nomad’s client IP:
dig @127.0.0.1 -p 8600 http-echo.service.consul SRV
and the result:
; <<>> DiG 9.16.1-Ubuntu <<>> @127.0.0.1 -p 8600 http-echo.service.consul SRV
; (1 server found)
;; global options: +cmd
;; Got answer:
;; ->>HEADER<<- opcode: QUERY, status: NOERROR, id: 63772
;; flags: qr aa rd; QUERY: 1, ANSWER: 2, AUTHORITY: 0, ADDITIONAL: 5
;; WARNING: recursion requested but not available

;; OPT PSEUDOSECTION:
; EDNS: version: 0, flags:; udp: 4096
;; QUESTION SECTION:
;http-echo.service.consul.  IN  SRV

;; ANSWER SECTION:
http-echo.service.consul. 0 IN  SRV 1 1 8080 0a000004.addr.dc1.consul.
http-echo.service.consul. 0 IN  SRV 1 1 8080 adf900c1.addr.dc1.consul.

;; ADDITIONAL SECTION:
0a000004.addr.dc1.consul. 0 IN  A xxx.xxx.xxx.xxx
server2.microk8s.node.dc1.consul. 0 IN  TXT "consul-network-segment="
adf900c1.addr.dc1.consul. 0 IN  A yyy.yyy.yyy.yyy
server1.node.dc1.consul. 0  IN  TXT "consul-network-segment="
Our testing http-echo job is visible in Consul UI as well: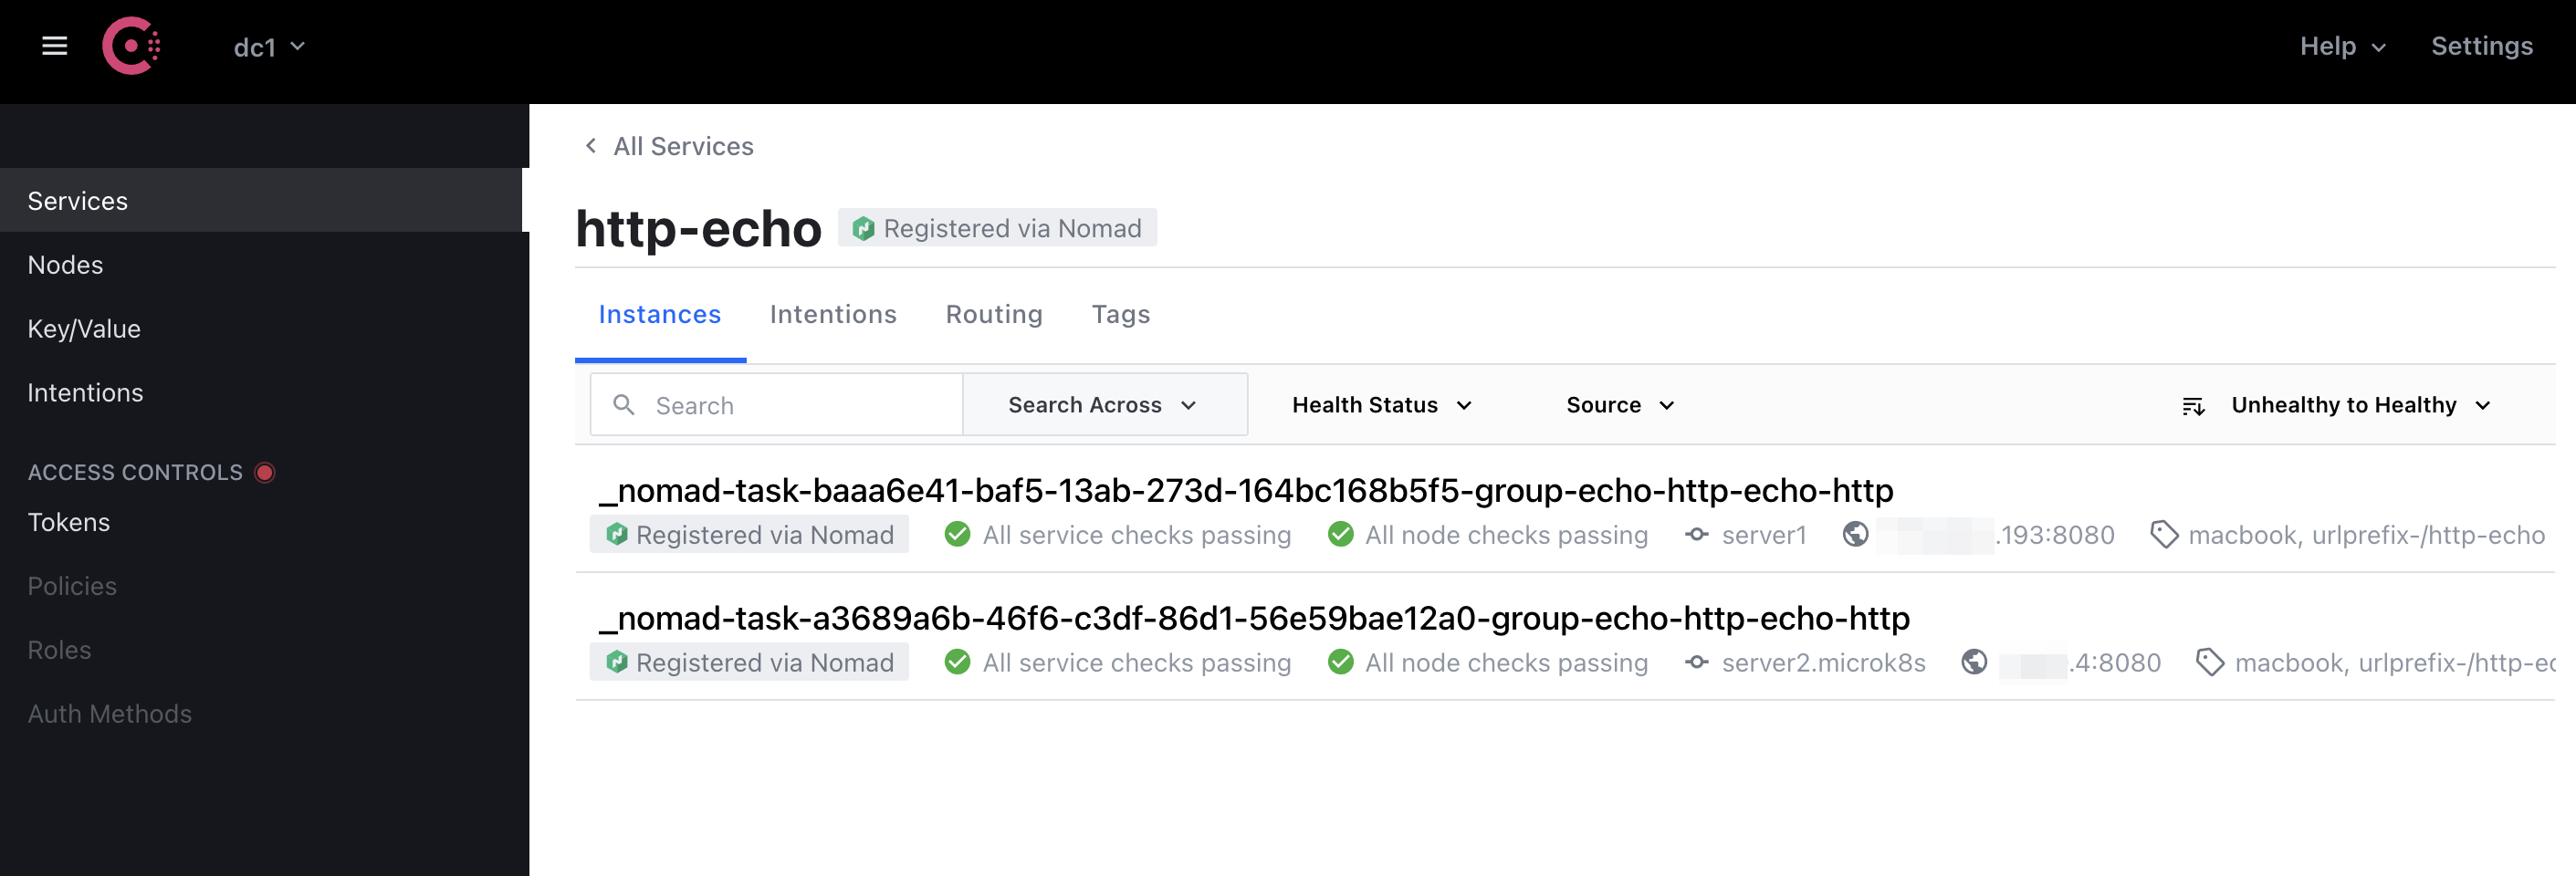
Resources
- https://www.nomadproject.io/docs/nomad-vs-kubernetes/supplement
- https://www.nomadproject.io/docs/nomad-vs-kubernetes/alternative
- https://www.hashicorp.com/c2m
- https://www.nomadproject.io/docs/nomad-vs-kubernetes
- https://www.nomadproject.io/docs/job-specification
- https://www.nomadproject.io/docs/configuration
- https://www.consul.io/docs/discovery/dns